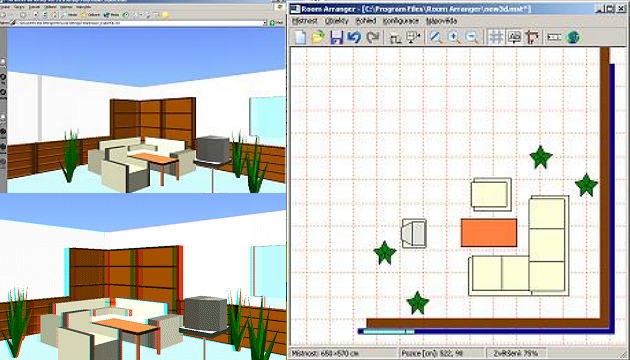
For creating rooms we will use the Czech program Room Arranger, which is freely downloadable on this page. (New versions are shareware, older versions up to version 3.26 are freeware.) After installation, run the program - and you can start creating.
This program seems to be working even 20 years after we first wrote about it.
Creation of rooms
First, create a room according to your own requirements. In the Room/Resize menu (or by clicking the button with the floor plan image on the button bar) you can specify the size of the room, or by clicking the Edit Walls button you can edit or add more walls (and create a floor plan of the whole apartment for example).
The adjacent button on the toolbar (or in the Objects/Add Object menu) allows you to place individual pieces of furniture in the room. At the top of the displayed window, select a bookcase (bathroom, bedroom, etc.) and then double-click on the selected object. This will be placed in the room and you can move it with the mouse, or right-click on it and, for example, rotate it via the menu. When you select properties from this menu, you can also set the size of the object, its position (for example, put a flower at a certain height above the ground on a table).
Creating a 3D image
Room Arranger displays a room in 3D via a web browser with a VRML plug-in. The Cortona viewer from Parallel Graphics has worked well for us. The spatial view occurs by pressing the button with the globe image in the Room Arranger.
Of course, to create a stereoscopic image, you need to create two images - one for the left eye and one for the right eye. To do this, after taking the first image, press the 3D view button again and change the start position. For example, if you are looking upwards in the plan (the rotation angle of the 3D view is 0), you can increase the x for the right frame by 10. If you are looking to the right or left, you will change the y coordinate; if you are looking obliquely at a 45 degree slant upwards (-45), you need to increase x and decrease y by the same value - for example, by 7. (The exact values will depend on the distance of the nearest object from the point you are observing from - it should be exactly 1/30. So if the nearest piece of furniture is 180 points away, move the 'camera' 6 points.)
The image created can be taken from the viewer, for example, by pressing the Print Screen key, then pasted into your graphics editor and saved. And the next step is the same as ever - you can create the resulting image in our 3DJournal software.
3DJournal, November 2003