Distance between cameras
The basic rule of thumb we'll be looking at is the distance you need to move the camera between the first and second frame (if you're using two cameras, then it's obviously the distance between the two cameras).
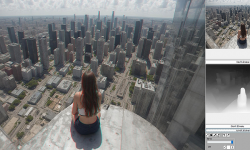
We mentioned that this distance should be around 7 centimetres. However, in actual photography it is recommended to follow a rather different rule - namely to set the distance to 1/30 of the distance from the nearest subject in the photo (see picture - the subject is at distance A, the cameras are A/30 apart). So, for example, if a tree is 2 metres from the camera and all the other objects in the photo are behind it, then the distance between the cameras (for the left and right shots) should be 2 metres / 30 = 200 centimetres / 30 = 6.66 centimetres.

The ideal distance between cameras is 1/30 of the distance from the nearest subject in the photo. Fig.: 3DJournal with help of getimg.ai
The distance is not random. It is based on the fact that the human eye is able to comfortably track objects at a distance of 2 meters and beyond as a single scene; however, it must refocus on objects that are closer. Since the goal is to produce a highly visible 3D photograph (stereo photography), the eye should not refocus. The nearest object should therefore be no closer than 2 metres - assuming that the eyes are approximately 6.66 cm apart (the international standard for stereo images has been set at 63.5 mm).
One more note - the one-thirtieth rule above applies to 35mm film and a 35mm focal length lens. For twice the focal length - and therefore when zooming in on a scene - you would then need to divide the distance by twice - that is, by 60. For normal compact cameras or mobile phones without zoom, you don't need to worry too much about this; if you use zoom, you need to move the camera between the left and right frames as many times less as you zoom in on the scene. You will see an example later here.
Examples of distance between cameras
If the first subject of the scene is closer, the eyes (i.e. the cameras used to take the left and right shots) should be closer together. This will cause the first object of the scene to appear further away (preferably within that optimal 2 meters) when we look at the stereo photograph with our (more distant) eyes.
If the first subject is further away, it is advisable to have a greater distance between the left and right cameras - this will accentuate the spatial effect and make the photograph more plastic. For example, if you are photographing a castle and a tree in front of it that is 30 metres away (and there is no object closer to you), then the distance between the cameras for the left and right shots can be up to 1 metre (30/30=1).
The further away the first subject is, the further apart the cameras should be.
If, on the other hand, the first subject is 90 centimetres away, then the cameras for the left and right shots should not be more than 3 centimetres apart (90/30=3). If the subject is closer than 20 centimetres, the one-thirtieth rule no longer applies - and the distance between the left and right cameras needs to be even smaller. For example, a distance of 2.5 mm is recommended for 10 cm, and only half a millimetre for 5 cm.
And an example on the zoom mentioned above: If you use, for example, a 3x zoom and the nearest object is 90 meters away, then the camera shift will be 90/30/3=1 meter.
A few more tips
For international stereography competitions it is often required that all photographed objects lie behind the viewing area (in our case behind the monitor). Nothing should protrude in front of it (we mentioned displacement in front of and behind the viewing area in our article on drawing 3D images in the July issue). But we, frankly, think that the effect of a protruding object can sometimes be very nice.
However, if an object is protruding from the image, it is definitely important to follow the rule that no part of the protruding object crosses the edge of the image (in our case, the edge of the screen).
If the 3D image is hard to see, try creating a black and white version of it (for example, in our 3DJournal program). If the latter is OK, then it will help the colour image if you take away the saturation of the colours. Do this in your favourite graphics editor, being careful - you will be editing the left and right images, not the resulting 3D image.
If you follow the rules above (along with those mentioned in our first text on this topic), then your 3D images should make a very good spatial impression indeed.
3DJournal, August 2003