I don't think many of us have two of the same digital camera on hand. If you are one of those people, then creating 3D video has been simplified for you. Simply place the cameras side by side - at a distance just like in 3D photography - and start recording (in the best case, you can link the cameras so that they start recording completely synchronously). And then make a few adjustments as described below.
The other option is to get one of the special 3D attachments for your camera. However, even this is usually not a cheap affair, and these accessories are not very versatile.
But there is another option. You can use a camera and a digital camera that can also take video. Alternatively, use a mobile phone instead of one of these devices. Sure - the quality won't be as high as 3D cinema, but current cameras and mobiles can already do video quite nicely.
Note from 2023: We shot videos according to this guide about twenty years ago, but today there is much better editing software and relatively affordable hardware.
Shooting a film in 3D
Place both devices (two cameras, a camera and a camera, or even 2 cameras) side by side so that they are pointing in the same direction - at the scene you want to shoot. The same rules apply as for taking 3D photos (the distance between the cameras should be 1/30 of the distance of the closest object to be filmed).
Prepare your actors and start recording on both devices. Ideally, you should start it at exactly the same moment, but in practice you will usually not be able to do this with conventional devices. Never mind. The results of your recording may still be good.
Transfer the footage to your computer in the usual way. Then start editing it.
The camera footage (often in MOV format) probably needs to be converted to MPEG or AVI before proceeding. There are a number of free tools for this conversion.
Creating 3D video - the first option
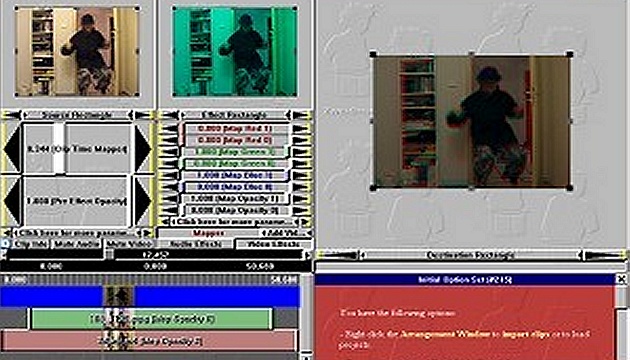
The first way to create a 3D video from the footage is to use some suitable editing software with effects. For example, Zwei-Stein is available for free and can be downloaded from this page. Install and run the program.
Now right click on the text Right click here to import media clip. Select Import media clip and upload your video taken from the right. Then click on the same location again and upload your video taken from the left.
Click on the first video and click on the Add Video Effect button above it to add Basic Effects - Mapper. Set both the Map Green and Map Blue sliders to 0 and the top Map Opacity slider to 0.5.
Click on the second video and add Basic Effects - Mapper above it with the Add Video Effect button. Lower both Map Red sliders to 0.
Since each video is shot with a different camera, each footage will probably vary in the size of the scene captured. For the one that takes up a larger area, shrink (with the mouse) the frame shown in the upper left corner of Zwei-Stein so that only the part of the frame that the other video also takes up is projected into the resulting video.
The video can be in anaglyph format, but also in a more universal parallel format.
Now the videos need to be moved with the mouse so that they both show the same thing at the same time. You can use the video preview to check this - you can see it in the window on the top right. You can scroll through the videos by dragging over the clips.
You can save the finished video by selecting File - Export and choosing one of the video formats.
Because transparency was used to create the 3D video and not color compositing, the resulting video will be darker than would be appropriate. However, the colour vibrancy and brightness can be adjusted in advance - or in the final video - using one of the common video editing programs.
Creating 3D video - the second option
Another easy way to create a 3D video is to edit it so that the two videos are merged into one, with the left one on top and the right one on the bottom. Alternatively, left on the left and right on the right.
Again, you can use Zwei-Stein. The procedure will be in many ways the same as in the first case, but this time you won't use Mapper. Click on the first video and in the preview window on the top right, shrink the rectangle into which the video is projected so that it only takes up the bottom half of the resulting video. Then, similarly for the second video, set the view for the bottom half. Save the video again by selecting File - Export and choosing one of the video formats.
Start Stereoscopic Player and if you don't already have it set to play anaglyphs made up of two images on top of each other, set it up (see the previously mentioned article for more on this). Record your video and put on your glasses...
The colors should be fine in this case, but the image will be somewhat distorted (two videos had to fit in one video in portrait). However, just export the video with different dimensions in a video editing program - the way you need it.
In conclusion
It should also be said that videos recorded by different devices may have different frame rates, so the corresponding frames will not always overlap exactly when creating a 3D video (and they will probably not overlap either because the two recording devices are not exactly synchronized). When you stop the image, you'll see these flaws clearly, but you shouldn't have much trouble with them when projecting.
3DJournal, April 2004