The following text is based on an idea submitted by our reader Radek Skačík. After discussing this idea with him, we started experimenting with it and now we bring you this text. And what is the idea?
A little bit of theory
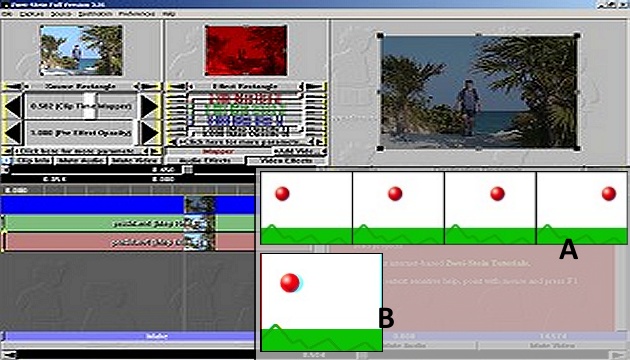
A video usually shows some movement. Let's say it's a balloon in the foreground flying to the right. This means that in each subsequent frame of the video, it is moved a little more to the right as indicated in the inset drawing A of the opening image.
Let's say we use the anaglyph method for the 3D view. Now imagine taking the red color from the first frame and the blue and green colors from the second frame and compositing them into one frame - the first frame of the new video. Then you do the same for the second and third frames - and you get the second frame of the new video. And so on. What happens?
If one object in the video moves in one direction, converting it to 3D is easy.
Because in each subsequent frame the balloon is a little more to the right, and you take the red from the earlier frames and the blue and green from the later frames - and because the right eye sees red through the glasses and the left eye sees blue and green - the right eye now always sees the balloon a little more to the left and the left eye sees it a little more to the right (you can see this in the inset drawing B of the opening image). And hey, that is the principle of 3D foreground objects!
And now, practically
In our editorial office, we ran a number of tests and finally found a software that is free and can perform the conversion explained above automatically. It is called Zwei-Stein and you can download it from this page. Install and run the program.
Now right click on the Right click here to import media clip. Select Import media clip and upload your video. Then click on the same place again and upload the video a second time.
Click on the first video and click the Add Video Effect button above it to add Basic Effects - Mapper. Lower both the Map Green and Map Blue sliders to 0 and set the top Map Opacity slider to 0.5.
Click on the second video and add Basic Effects - Mapper above it with the Add Video Effect button. Lower both Map Red and Map Red sliders to 0.
Now move the second video a little to the right with your mouse (you can move it one frame or more - experiment with each video). You can see the resulting image for the various parts of the video in the preview window on the top right. Scroll through the video by dragging over the clips.
You can save the video by selecting File - Export and choosing one of the video formats.
Best possible results
In practice, of course, it's usually not the case that only one object moves in the video, plus it can move right for a while, then left, then up. In that case, you need to set the filters differently for different parts of the video - sometimes you'll take the red from earlier frames, sometimes you'll want to take it from later frames (and vice versa for the blue and green).
Sometimes the motion captured in the video will have such characteristics that a reasonable conversion to 3D video will not be possible. It is always necessary to experiment a bit and look for the best solution.
Some videos will be impossible to convert to 3D using this simple method.
Because the above method uses a semi-transparent first color layer and a second color layer underneath, color and brightness loss must be accounted for. If this would bother you, we recommend making corrections in the video editing program you use for your regular work. Another option is to create the video not as an anaglyph, but for parallel display.
3DJournal, April 2004