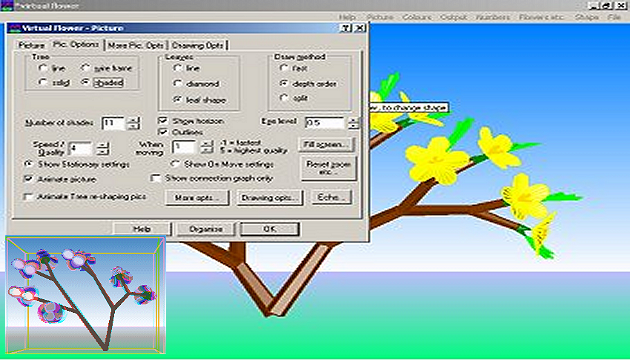
The program we will use to create 3D flowers (and other shapes) is called Virtual Flower. The freely distributable version has some limitations, but it will be fully sufficient for our work - at least initially.
Note from 2023: This article was published on 3DJournal 20 years ago and is no longer current. We leave it here only as a reminder of those times.
After downloading the program, run it, then confirm all the options during installation and you are ready to go. Unless you choose otherwise, the program icon will appear on your desktop and in the Start menu.
Let's start
When the program is started, a 'standard tree' will appear on the screen, which you can return to at any time by selecting File/Reset. If you press the left mouse button anywhere on the program's desktop and move the mouse, the tree rotates. If you hold down the right button, you move the camera towards the top or bottom of the tree.
You can perform more complicated operations from the menu. We recommend always selecting the last item in each menu (Tabbed), which contains all the previous items available through the overview tabs. In addition, it is more reliable - on some computers, only the top bars of the windows are displayed instead of the other options - and you need to expand them to a usable size each time you use them.
Rendering method
The final appearance of the image is greatly influenced by the way it is rendered. This is set via the Picture/Tabbed item. Select Pic from the tab. Options tab and at the top you can set the way the tree trunk, leaves or horizon are displayed. When you click on each of the options, the picture changes immediately so you can see which button is used for what.
In the More Pic. Options you can set - finally - to show the image not only as normal, but as an anaglyph too. Check also custom and red/cyan, and we recommend tree frame/box - the frame complements the perspective nicely. Parameters Screen dist. and Eye separation parameters should be set so that you can see the image through the glasses as best as possible. For us, the values 4 and 0.07 work well for regular trees. Note the Stereoscopic pair option - we'll need that later - and Normal, which you should switch to now - this mode is better for normal tree editing after all.
You may be surprised that the program can only make black and white 3D images. That's a bit of a bummer, but at the end of the article you'll learn how to easily work around this shortcoming.
In the last tab of Drawing Options, notice the option to set a so-called timeout - if the rendering takes too long, the program would abort after a certain time and show a message about it. If you want the drawing to always finish, you need to set the timeout time to a sufficiently long time.
Colors
Colors are set in the Colors/Tabbed menu. Just click on the colour you want to change and set the new colour on the colour circle - and on the bars on the right. If the window with the color circle doesn't show up - and only the top bar of the window appears instead - go to the bottom edge of that bar and expand the window. There is no need to confirm the colour choice, just close the window.
Your own 3D trees
Now let's start editing the tree - from the Flowers etc./Tabbed menu. In the first tab we change the shape of the leaves. You can either select it from the list on the bottom right (Leaves) or change the already selected ones manually - by dragging each point of the leaf edge on its image. You then use the Size for leaf option to adjust the size of the leaf. All changes are reflected directly in the main image.
Use the Add to button (or the tab of the same name) to add leaves, flat flowers (Sheet flowers) and 3D flowers to selected groups of branches (just try clicking in one of the bars). You can then change the properties of these flowers in the corresponding tabs. In the Objects tab, you can also select one of a number of different objects to replace the flowers on the tree. For example, cubes can grow on the branches. You can then use the Petal tab to change the shape of the petals.
The shape of whole trees can be influenced in the Numbers/Tabbed menu. For example, you can use the Branches option to tell how many branches should grow from each 'knee', and the Stalks option to tell how many leaves (or leaf stalks) should grow from each 'knee'. The numbers in the rows mean, for example, how each additional leaf on a branch is rotated (so if there are 3, adjusting the second number will change the rotation of the second leaf on each branch). We recommend that you test how changes to these numbers affect your tree by trial and error.
The Numbers B tab adds some additional parameters to your tree - for example, the length of branches (growing from the same place) - Lenghts of branches, or how branches that grow on top of each other get shorter (Scale at each step).
Some of the changes you made in the last two menu items can also be made via the Shape/Tabbed option. Meanwhile, some of the changes here can be made by dragging the mouse, which is certainly nice.
Let's create in 3D now
Although it may not seem like it, you can create shapes other than just trees in the program. For example, just string some strange shapes on the branches and then choose Shape/Branches/Branche shapes - none. The branches will disappear, while the shapes will remain.
Another interesting option is animations. To create a moving image, head to the Output/Animations menu. For example, use Trees grow or Leaves grow to make the program animate the growth of a tree or leaves. Don't forget to turn on the Animate main Win option. and shape tree. Under Cycle time, you can then set how long (in seconds) the animation should take.
If you're looking for inspiration for your own creation, be sure to head to the File/Open menu and open one of the images that come with the program.
3D colour images
As mentioned in the introduction, Virtual Flower can only create black and white anaglyphs (3D images for red/blue glasses). Fortunately, this limitation can be overcome quite easily. Simply set up a Stereoscopic pair in the Picture/Tabbed/More menu, then save the screen to the clipboard (by pressing the Print Screen key) and in some graphics editor cut out the left and right images and save them both (note that the right one is left and vice versa).
Then load them into 3DJournal and you're done. If the color result doesn't look good - and the black and white image in 3DJournal does - try suppressing the color prominence in the aforementioned graphics editor or in 3DJournal itself.
3DJournal, July 2003