Let's start with a brief overview of how to actually shoot 3D, or, if you prefer, stereoscopic video.
Note from 2023: This article was published on 3DJournal 20 years ago and is no longer very current. We leave it here as a reminder of those days.
3D video/3D film shooting
Take two videocameras or two cameras (or two smartphones, of course) capable of shooting video. Place them side by side, preferably so that their lenses are about 7 centimetres from each other. (Sometimes turning one device upside down helps.) And record. On both cameras/camcorders at the same time.
The closest object being filmed should be no closer than two metres to the camera. This is a rule of thumb. If you are interested in more precise rules, you can find them on our website or you can experiment a bit.
3D video/3D movie creation
Convert the recorded video to single frames. For example, you can open it in VirtualDub (free, downloadable here) and save/export it as a sequence of frames. Do the same for the footage from both cameras/photos.
In 3DJournal, open the first image from each recording (i.e. the left and right) and use the corresponding button to create a 3D image. (It is advisable to do this with 3D glasses on.) Use the scissors to mark the area to be saved, select the resulting size in the x2 menu (e.g. HD) and save the image in stereo jpg (jps) format, for example as 3D0001.jps. Fill in the number of images in the Extra menu and start processing.
In VirtualDub open the first frame (3D0001.jps), in the Video menu set the Frame rate (the most common suitable value is 30, set it in the Change frame rate... and Convert to... line) and Compression to DivX MPEG-4 (here you can also specify the quality, e.g. to 6). In the Audio menu you can also set the audio source. And save as Avi.
Upload a 3D video/3D movie to YouTube
Log in to your YouTube account and upload your video in the normal way. In the Tags field, type: yt3d:enable=true. If the video is widescreen (e.g. HD), add: yt3d:aspect=16:9. (You can also add other tags, for example: yt3d:enable=true yt3d:aspect=16:9 Prague metro.)
Then wait a moment while YouTube converts the video to all quality levels. And now your 3D movie can premiere. Don't forget to show it off to your friends on Facebook.
Tips and tricks
If your cameras use a video format that VirtualDub will not open, convert it to a standard format, for example, with iWisoft's Video Converter .
To synchronize the two videos, you can preferably use the double arrow buttons in 3DJournal. You can then move forward or backward through the video frames. If you hold down the Shift button at the same time, only the left image will scroll.
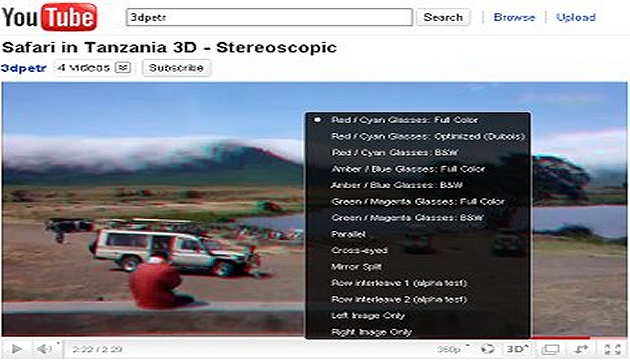
If you only see a lower quality 3D HD video on YouTube, try waiting a moment. It takes a while to convert to HD. Remember that on YouTube, you can toggle the display quality and the way the 3D video is displayed (anaglyph, interlaced, yellow and blue, crosshatch, etc.) with the switches below the video.
3DJournal, July 2004